A HUGE thanks to Katie Sarokhanian, for sharing her expertise with us today on the blog. Katie is an artist and interior design lover who lives by the mantra: “your home is your creative canvas”. She is a mom of 5 and has an amazing attention to detail as made apparent below. I am so excited to have her join us over here at Restoration House for a little DIY that just about anyone could tackle in their own home.
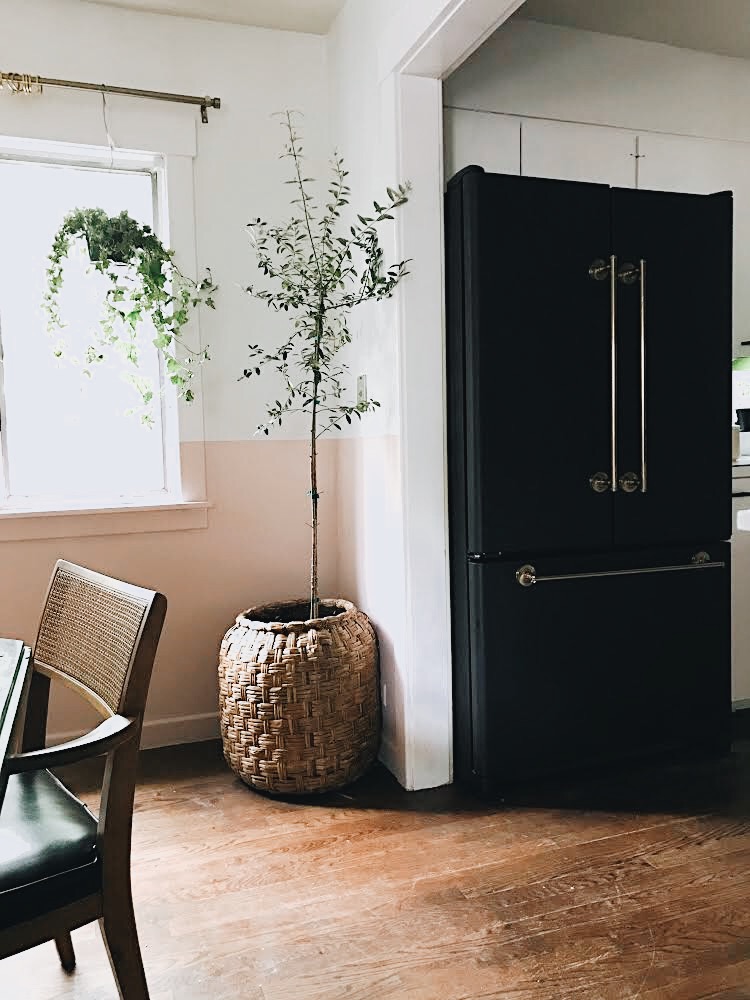
I’ve been frustrated with the lack of options for fridges these days. Stainless steel has been reigning at the top of the refrigerator world, and I see why, but I wanted something different. Wish List: 1. High-end look 2. Unique 3.Fits my space 4. Coordinates with the brass and gold in my kitchen 5. Works well and 6. Inexpensive. Sound super attainable, right?
I found a new matte black refrigerator online that I fell in love with, but it came with a $3k price tag. Since we’re not ready for a total kitchen renovation, I decided to make my own matte black beauty.
One of the most important steps is to find a good stainless steel fridge to “ruin”, of course! I found this one on Craigslist for $200. It was fairly new, the right size, a great brand, and worked perfectly, but had one big scratch on the front and thus the low price. Great candidate for a painted-fridge experiment!
Here’s the breakdown of how I updated this refrigerator, which included, sanding, priming, painting, and replacing the old handles with new matte brass handles.
1. REMOVE THE OLD HANDLES.
Look on the side of the handle and you’ll see a small hole. Grab an allen wrench to loosen the screws, and the handles will come right off! Shockingly simply. If your fridge has a glued-on logo on the front, I also suggest taking that off for a custom look. I popped mine right off using a flat head screwdriver.
2. MEASURE HOLE-TO-HOLE.
It’s WAY easier to install new handles if they’re the same size as the existing holes. There are a wide range of appliance handles that you can purchase that look great, but they’re also expensive, which defeats the purpose of trying to make an affordable update to a used fridge. So, my solution was a towel bar. No, really! I searched on Amazon for something brass with 24” hole-to-hole measurement and found these for $29:
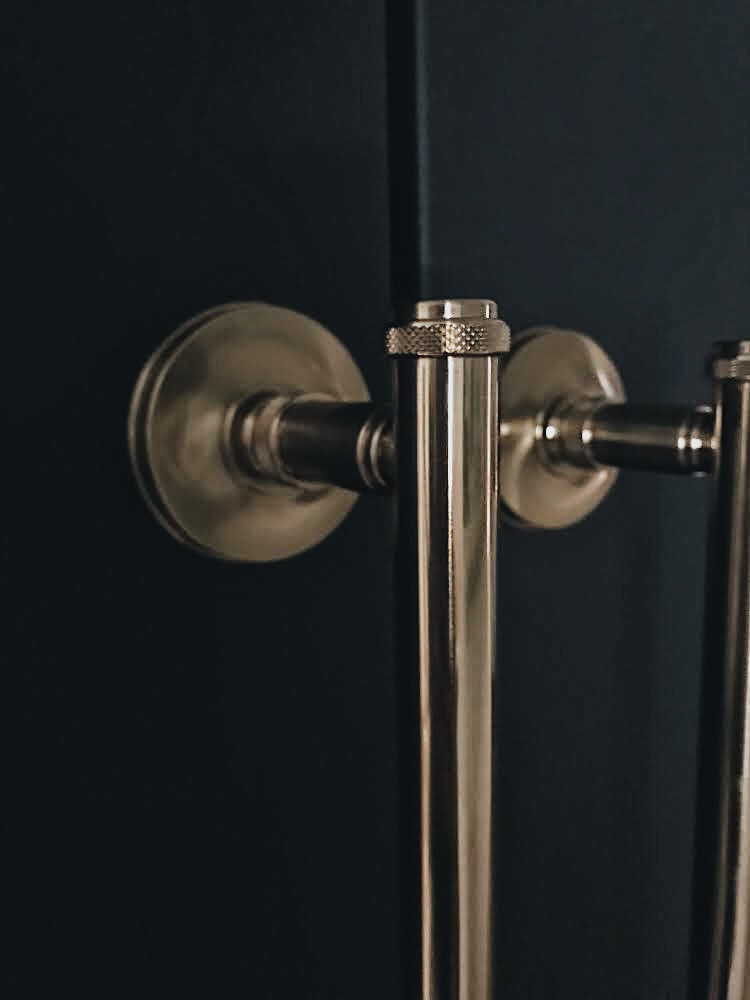
(The ones I bought are out of stock but there are many other gorgeous options, like these.) I also looked at grab bars like these, which might be a good option for your fridge depending on your handle measurements.
Or, of course, you can keep your existing handles and just paint those too!
3. PREP THE STAINLESS STEEL.
First, I sanded the metal with a fine sanding block. Next was primer. There are a lot of primers out there made specifically for metal. I usually walk into a Sherwin-Williams store, tell them what I’m doing, and they have great suggestions for the right type of paint and primer to use. That is one option for you and I’m guessing it would work just fine. This time, however, I used something called “self etching primer” instead of the usual metal primer. Self-etching primer is customarily used on automobiles, but I thought I might try it here since at our house, our refrigerator has to withstand loads of abuse and heavy scrubbing. There are a lot of different brands and options online, and you could buy it in a spray can or roll it on. But, make sure to buy a dark-base primer. (I accidentally bought a white tinted primer, which still worked fine but I had to do about 5 top coats of black paint.)
4. PAINT THE FRIDGE BLACK.
I bought Sherwin-Williams “Emerald” latex paint in a matte finish in Tricorn Black. It looks great! I did about 5 coats on the front using a small foam roller. On the sides of the fridge, which were not stainless steel, I didn’t sand or prime at all. I simply put on two coats of this same paint, which is a paint/primer combo. Mostly that’s because the sides are rarely touched or scrubbed and thus didn’t need to be as durable.

5. INSTALL NEW HANDLES.
To install my new handles, all I did was follow the mounting instructions that came with the “handle” (towel bar) and screwed right into the exiting anchored hole on the refrigerator door. It was simple and they are now sturdily attached! However, the bottom handle of the fridge was a bit more difficult. After a few days, the handle started to get loose. Why? Because to open the bottom freezer drawer, you have to pull OUT and UP at the same time, which strained the mounting hardware that was designed for a towel bar, not a freezer drawer. My solution was this product called JB Weld. The salesman at Lowes said he once used it to attach a trailer to a broken hitch, so I figured it was strong enough for a handle. I put a dab of the putty between the mounting hardware and the handle and clamped it for an hour or so. So far it has worked great! If you couldn’t find handles that fit your existing screw holes, you could possibly use this same product to attach your new handles. I would still screw right into the refrigerator door, then reinforce the mount with the JB Weld putty.

After attaching the handles, I was done! It took just 3 days to complete due to drying and re-coat times, (and due to the fact that I was slowly moving, 9-months-pregnant lady trying to crawl around and paint a fridge in the middle of the night).
I now have a custom, high-end looking refrigerator instead of the giant, stainless steel BEAST that took up all the visual space in my kitchen, and I couldn’t be more thrilled! Honestly, I prefer the look of this DIY refrigerator to any new models I could buy—at least any new models I could buy that are less than about 8k dollars, if you know what I mean.
So, if you have the same stainless-steel-hating problem, if you are aching for something creative for your kitchen, and if you’re not afraid of a little paint—give it a try! Someone once told me that you can’t ruin what you already hate, and that gave me the push to not only paint my refrigerator black, but to paint my cabinets pink. Gasp! That was such wise advice. Now I’m passing it along. Get creative my friends, because your home isn’t just your home, it’s your canvas too.
SOME HELPFUL FAQ’S |
Here are a few questions I got from my Instagram readers that you may also have:
How do you paint your handles if you want to keep your same handles?
I would suggest a light sand, and using the spray can version of the self-etching primer (assuming your handles are also stainless steel).
Can you paint a fridge that’s not stainless steel?
Sure, why not? I wanted to do it on a stainless steel surface because it would have a much smoother look than the alternative, textured refrigerator surfaces.
How is the paint holding up?
Great so far! It’s been about 6 weeks. I considered putting a matte poly over the topcoat, but since I had a baby the day after I finished this project, I never got around to it. I can guess that it might add an extra layer of protection, and I still might do that someday.
What about that scratch on the refrigerator?
(The original finish had a few minor scratches)
It’s almost completely unnoticeable after painting! So, if you want to give this a try but are afraid to do it on an expensive stainless fridge. Look for an inexpensive one like mine with scratches. Here is a close-up of the scratch in the bottom left corner. (I didn’t attempt to repair or fill the scratch at all.)